How to Create a Property Tour Video Step-by-Step
Publié le :
June 16, 2026
If you're selling real estate in 2026 and you're not using property tour videos, you're basically showing up to a Formula 1 race on a bicycle. Sure, you can still get somewhere, but everyone else is moving a whole lot faster.
Buyers love video because it gives them something photos can't: a real sense of space. A great property tour helps people understand how rooms connect, how natural light moves through the home, and what it actually feels like to walk through the front door. And here's the crazy part—you don't need a giant budget or a professional film crew to make one.
Whether you're a real estate agent, property manager, investor, or homeowner, creating an effective property tour video is easier than most people think. The secret isn't fancy equipment. It's having a simple process and sticking to it.
Let's walk through exactly how to create a property tour video step by step.
Why Property Tour Videos Work So Well
Before grabbing a camera, it's worth understanding why property tour videos have become such a big deal.
Think about how people shop for homes today. They're scrolling listings on their phones while sitting at work, hanging out at home, or waiting for their food delivery to arrive. They want information fast.
Photos are great, but they only show isolated moments. A video tells a story. It guides viewers through the property exactly the way they'd experience it in person.
That extra context creates confidence. Buyers can quickly decide whether a home is worth scheduling a showing for, which means you spend less time on unqualified leads and more time talking to serious prospects.
Plus, let's be real—video simply grabs attention better. In a sea of static images, movement wins.
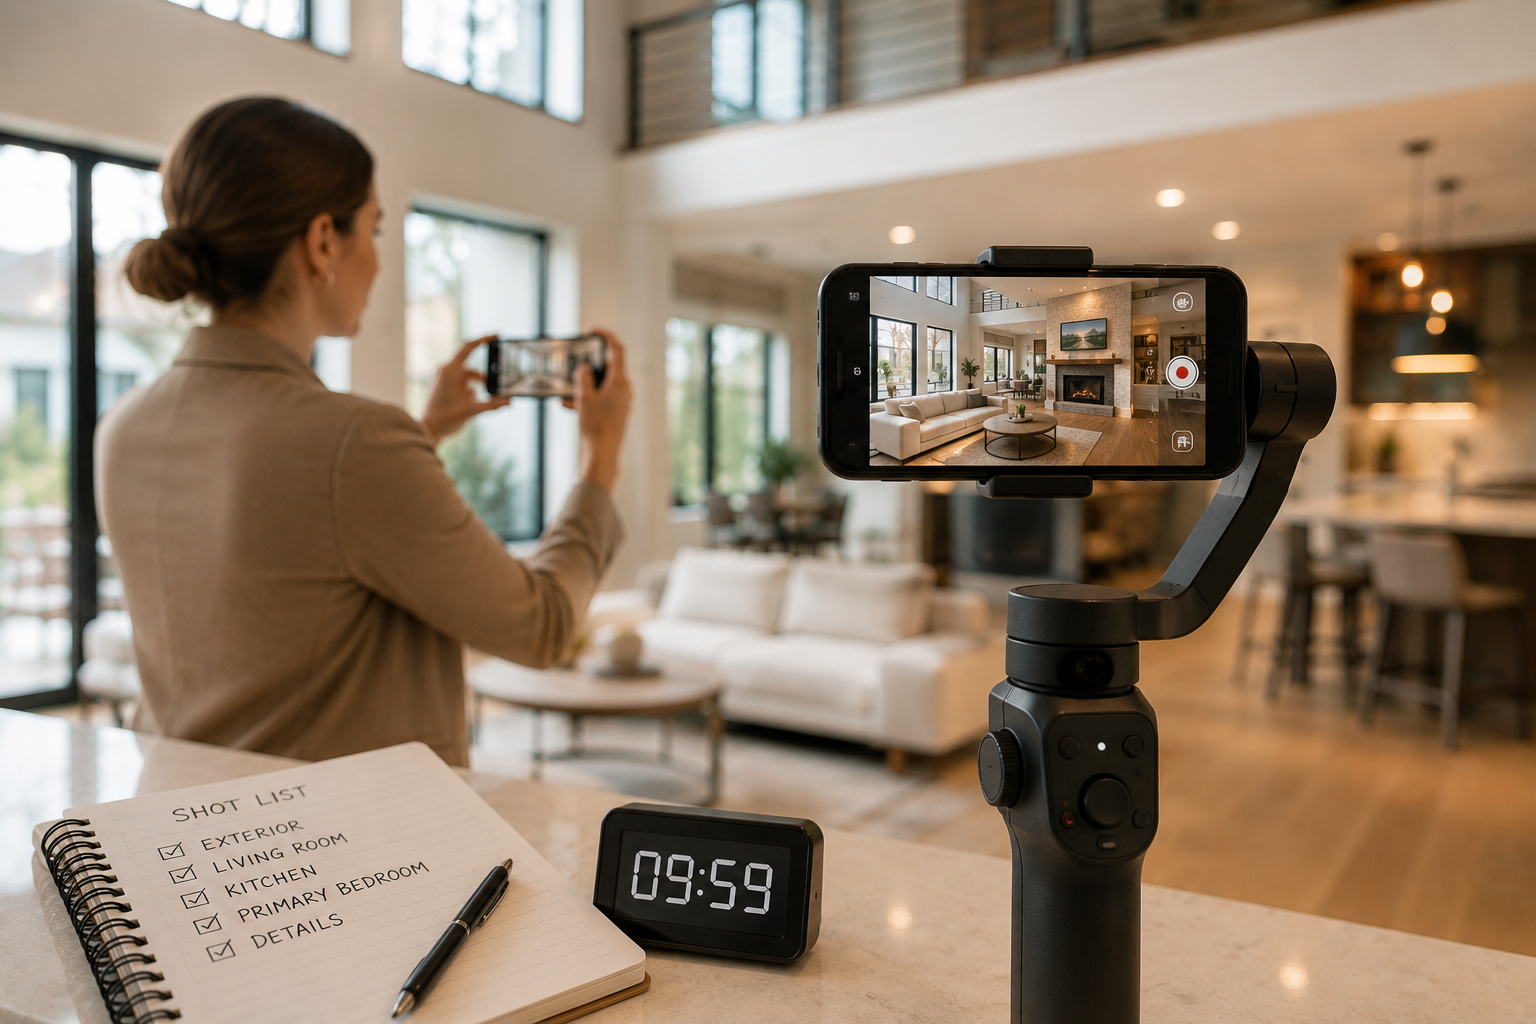
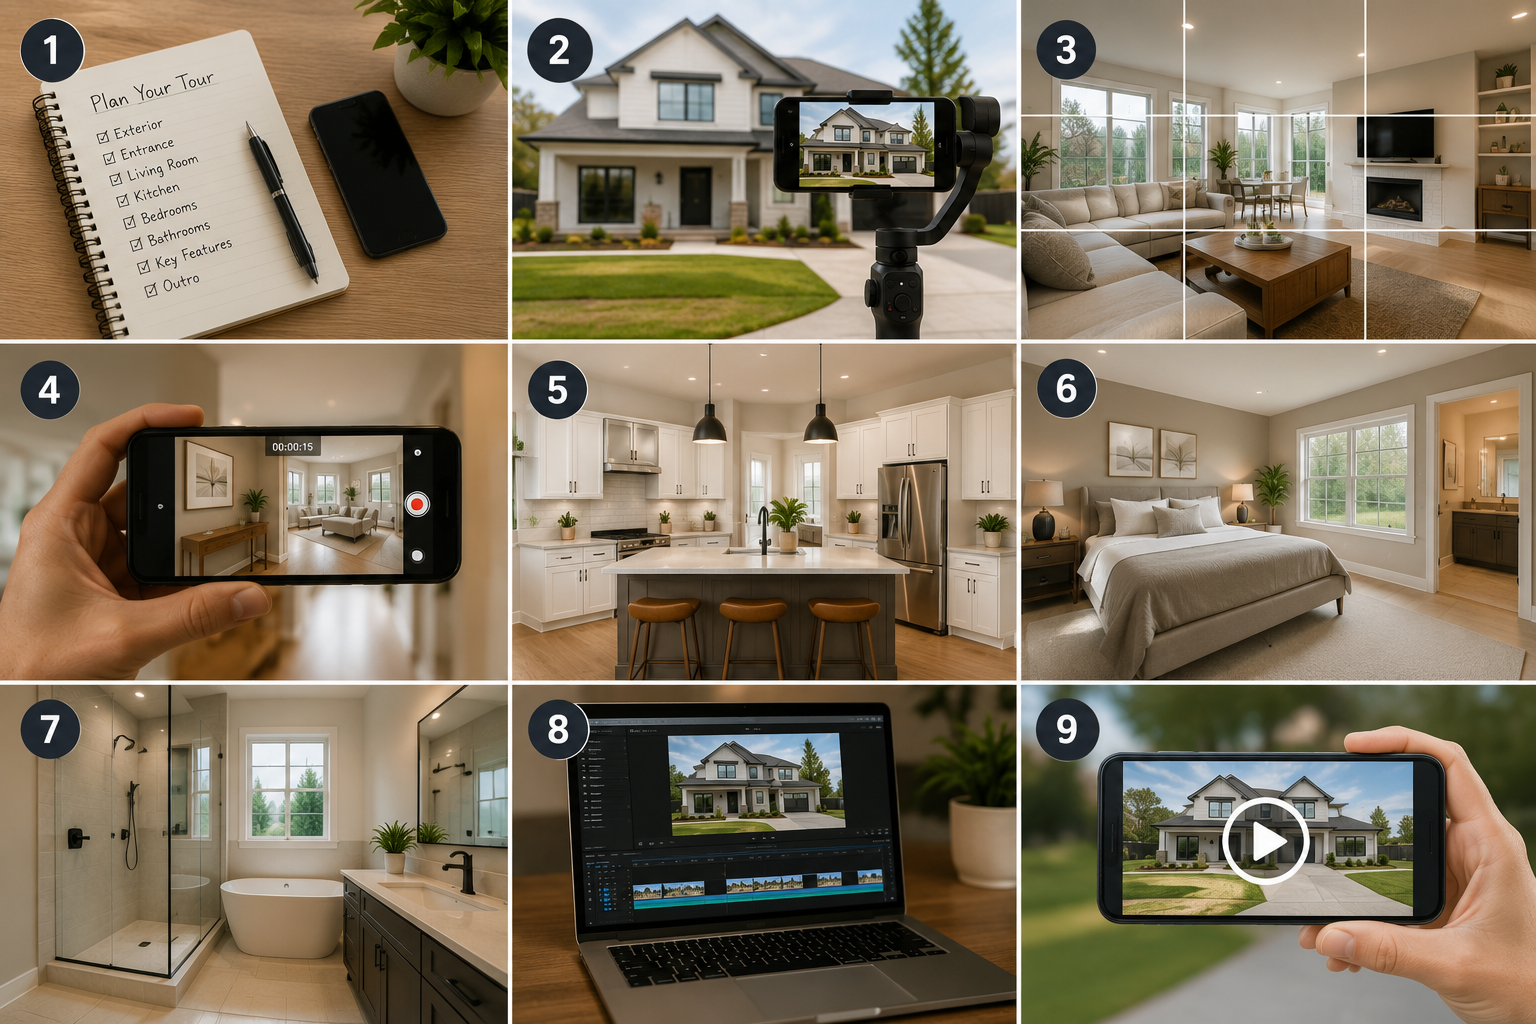
Step 1: Prepare the Property Before Filming
This is where a lot of people mess up.
They get excited, pull out their phone, hit record, and start walking around. Big mistake.
The camera sees everything.
Every stray shoe, every pile of mail, every wrinkled blanket suddenly becomes part of the production. Before filming, spend some time making the property look its absolute best.
Open the blinds and curtains to let natural light flood the rooms. Turn on all interior lights. Remove clutter from countertops and tables. Straighten furniture and fluff pillows. Hide trash cans if possible. Even small details can make a room feel cleaner and more inviting.
Think of it like getting ready for a first date. You don't need perfection, but you definitely want to make a good impression.
A little prep work can dramatically improve the final video without costing a dime.
Step 2: Plan Your Walking Route
One of the easiest ways to create a professional-looking property tour is to avoid random movement.
Don't just wander around hoping for the best.
Instead, decide on a clear path through the property before filming starts. Most tour videos follow the same natural progression a buyer would experience during an actual visit.
Typically, that means:
- Front exterior
- Entryway
- Living room
- Kitchen
- Dining area
- Bedrooms
- Bathrooms
- Backyard
- Special features
Planning the route ahead of time keeps the video flowing naturally and prevents awkward transitions.
Think of yourself as a tour guide showing a friend around the home. Every room should lead smoothly into the next.
When viewers never feel lost, they stay engaged longer.
Step 3: Use the Right Equipment
Here's some good news.
You don't need a $5,000 camera setup.
Modern smartphones shoot incredible video quality. In many cases, an iPhone or Android flagship device is more than enough for real estate content.
That said, a few affordable accessories can make a huge difference.
A smartphone gimbal helps eliminate shaky footage and creates those smooth walking shots viewers associate with professional videos. A wide-angle lens attachment can also help capture more of each room.
If you're using a dedicated camera, make sure stabilization is enabled and shoot in at least 4K resolution whenever possible.
Smooth movement matters far more than expensive gear.
Buyers will forgive average equipment. They won't forgive footage that looks like it was filmed during an earthquake.
Step 4: Film Slowly and Smoothly
This step is where the magic happens.
Most beginners move way too fast.
When filming a property tour, slow down. Then slow down again.
Seriously.
Walk carefully through each space while keeping movements smooth and controlled. Let viewers absorb the room instead of rushing them through it.
A common technique is the "glide and reveal." Start with one angle of a room and slowly move forward or sideways to reveal more of the space. This creates a sense of discovery that feels natural and engaging.
Avoid sudden turns or quick pans. Fast camera movements can make viewers dizzy and make rooms appear smaller than they actually are.
Remember, you're not filming an action movie. You're helping someone imagine where they might live.
Step 5: Capture the Property's Best Features
Every property has something special.
Maybe it's a massive kitchen island. Maybe it's floor-to-ceiling windows. Maybe it's a backyard that feels like a private resort.
Whatever makes the property stand out deserves extra attention.
Spend additional time filming those unique features from multiple angles. Slow tracking shots work particularly well for premium details.
If the home has amazing natural light, capture it. If there's a stunning view, show it off. If the fireplace is a centerpiece, make sure it gets screen time.
The goal isn't simply documenting rooms.
The goal is highlighting what makes this property memorable.
Because let's face it—buyers see dozens of listings. You want yours to stick in their minds after they've finished scrolling.
Step 6: Edit the Video Like a Pro
Good editing can take a decent property tour and make it feel polished.
The good news? Editing software has become ridiculously easy to use.
Apps like CapCut, Canva, Adobe Express, and other AI-powered editors can automatically trim clips, add transitions, insert music, and create captions.
Keep the final video between 60 and 180 seconds whenever possible. Long videos tend to lose viewers before they reach the best parts.
Use smooth transitions between rooms and maintain a consistent pace throughout the tour. Add simple text overlays highlighting key features such as:
- 4 Bedrooms
- Chef's Kitchen
- Waterfront Views
- Newly Renovated
- Large Backyard
Keep text minimal. The property should remain the star of the show.
Step 7: Add Music and Branding
Music might seem like a small detail, but it completely changes how a property feels.
The right soundtrack can make a home feel warm, modern, luxurious, energetic, or relaxing.
Choose music that matches the style of the property. A downtown condo and a luxury estate probably shouldn't use the same vibe.
Keep branding subtle. Add your logo, website, or contact information near the beginning or end of the video.
Nobody wants to watch a giant advertisement.
The focus should always stay on the property itself.
A clean call-to-action at the end works perfectly, such as:
"Schedule your private tour today."
Simple. Effective. Done.
Step 8: Optimize for Social Media
A lot of agents create great videos and then post them incorrectly.
Don't let that be you.
Most viewers are watching on mobile devices, so vertical video formats often perform best on platforms like Instagram Reels, TikTok, Facebook Reels, and YouTube Shorts.
Create multiple versions of your tour video if possible:
- Vertical for social media
- Horizontal for YouTube
- Website version for listings
- Short teaser clips for promotion
Repurposing content allows one video shoot to generate weeks of marketing material.
That's how smart marketers squeeze every drop of value from their content.
Final Thoughts
Creating a property tour video doesn't have to be complicated, expensive, or time-consuming. With a little preparation, a smartphone, and a clear plan, you can produce engaging tours that help buyers connect with properties long before they step inside.
The formula is pretty simple: prepare the home, plan your route, film smoothly, showcase standout features, edit with purpose, and share the final video where buyers actually spend their time.
The best property tour videos aren't necessarily the ones with the biggest budgets. They're the ones that make viewers stop scrolling and think, "Wow, I could actually see myself living there."
And when your video creates that feeling, you're already halfway to a successful sale.
Des vidéos immobilières, en toute simplicité.
S'abonner